The current teamwork system is a fairly complex system, relying heavily on a circular view teamwork. This document aims to show the best efforts in understanding the teamwork values. The vast majority of this work was originally done by the manager Widzy at XpertEleven, who has gracefully allowed his original slideshow to be converted to this page, with some updates being performed.
Oh, and everyone remember to thank Widzy, mkay?
The player
Each player has a hidden teamwork value. This value is used to determine how well the player interacts with the rest of the player in your team.
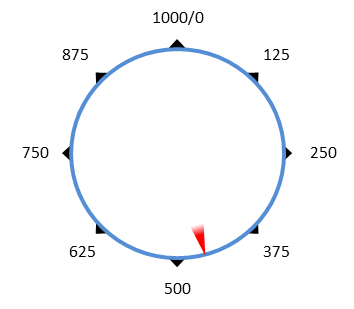
Like all teamwork values, this value is a number between 0 and 999, but the value itself does not denote how well the player works in our team. A player with a teamwork value of 5 isn't always a worse (or better) fit than a player who has the value 700.
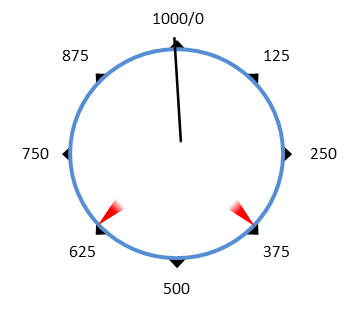
The core concept behind the teamwork system is how this scale is circular, instead of being linear. If one player has a teamwork value of 10 and another player has a teamwork value of 990, their difference is 20, not 980. This implies that the furthest apart two players can be is 500 points. It is easiest to think every players teamwork value living on the circumference of a circle as shown to the right.
The team
Each individual team also has a hidden team work value, which is the average value of all the players.
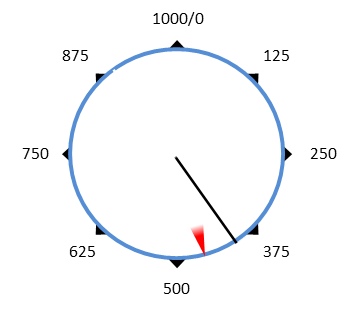
The black line denotes a team's team work, in this example, the team's teamwork value is about 400. If we compare this with the player from the first slide, we can see that his teamwork value is quite close to the team's teamwork value... The distance between a player's teamwork value and the team's teamwork value determines how settled he/she is, lots of settled players will produce higher teamwork values seen in the result screen!
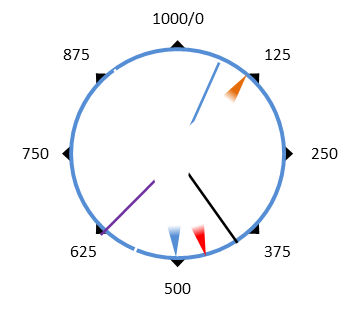
Since each team has their own teamwork value, different players will settle in better at different clubs. In this example, the red player would settle in well at the black club, pretty good at the purple club, but will be poorly compatible with the blue club. The orange player would be most compatible with the blue club, and the blue player would prefer either the purple or black club, but would find it hard to settle at the blue team.
By evaluating players on the transfer market, you can see that player's compatibility with your team -- this will be either poor, fair, good or excellent.
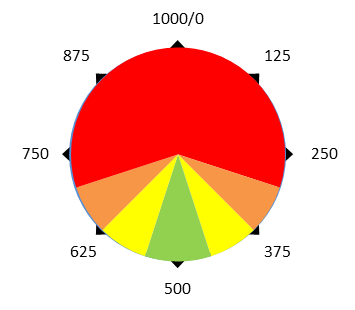
This version of the team's teamwork value diagram shows what this means. If the team's teamwork value is 500, then we can see that if a player's teamwork value is anywhere in the green area, he is said to have excellent compatibility. The yellow is good, orange is fair and red is poor compatibility.
Overall compatibility
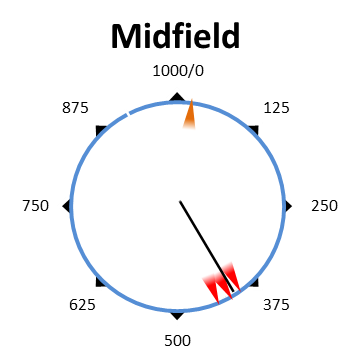
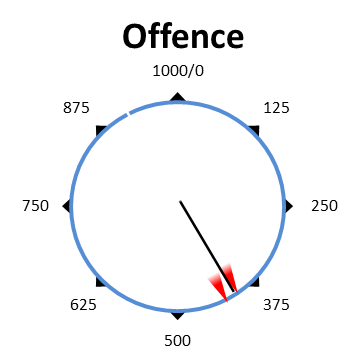
Lets look at an example, imagine we are playing 4-4-2, and the following images display the current teamwork values of every player in the starting line-up. Each arrow represents a player's own teamwork value, and the black line represents the team's teamwork value.
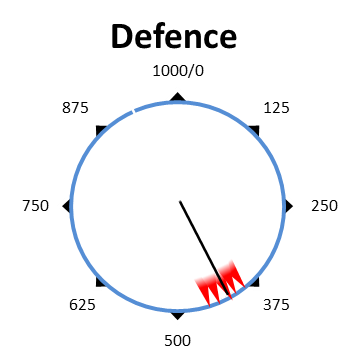
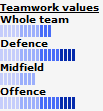
This could result in the follow team work rating being displayed.
As you can see, the defence (which includes the goalkeeper) work very well together, but the midfield's teamwork has been reduced heavily due to the player with the orange arrow. Just like the defence, the offensive players are all close to the team's teamwork value, so the offensive teamwork value is good.
Players who aren't perfect fits can be punished by a performance penalty of up to 25%. This is an individual penalty that doesn't apply to the team part directly. Indirectly of course, the reduced performance of the players with non-optimal performance will make the team part weaker.
Improving
As in real life, the teamwork of your team will improve the more they play together. After each game that a player plays, his/her teamwork value will move towards the teams teamwork value. In the example, both players will reach the teams teamwork value at roughly the same time, one will move clockwise, the other anti-clockwise.
The further away from the team's teamwork value a player is, the faster his/her teamwork value will move towards the team's teamwork value, at a maximum rate of 5 teamwork points per game if the player is in the "poor" compatibility range, and 3 once the player becomes "fair" or better. It will still take a very long time to reach excellent compatibility if your player is particularly far away from the teams teamwork value!
Players with the 'Diva' special quality find it harder to get along with others, and as a result, their teamwork value will move towards the team's teamwork value slower than a player who is not a Diva. Divas can also move away from the teamwork value in question.
A diva who joins your club with excellent compatibility will actually get on just fine with the rest of your team, contrary to what his diva special quality suggests -- it just means he'd normally find it harder than most to move to a new club. However, a diva with poor compatibility could keep teamwork levels low for a very long time while the teamwork value slowly adjusts towards the teams teamwork value over many seasons.
Eventually, given enough games, even a team full of originally 'poorly compatible' players will gel together and start getting excellent team work scores in the match report.